Home
/
Blog
/
Event Tracking in GA4: How to Set Google Analytics Custom Events
How to Set Cutom Event Tracking in GA4

Event Tracking in GA4: How to Set Google Analytics Custom Events

Publish date
September 13, 2023
Author
Team Marketechy
Category
Discover how Google Analytics 4 outpaces Universal Analytics, becoming the choice of digital marketers for in-depth event tracking insights. Explore our guide on how to configure GTM tracking for custom events for granular exploration of user journey.
Table of contents

At the moment, we can firmly say that Google Analytics 4 calmly pushes forward and gets ahead of Universal Analytics. Digital marketers commonly endorse GA4 whenever it comes to deeply insightful event tracking.

GA4 was primarily promoted as an event-driven analytic platform, and it’s proven to have achieved its purpose. A new type of event measurement brings more visibility into the user journey. In particular, GA4 enables separate data streams to automatically collect essential in-app and web events, ensuring high-level tracking precision in tracking users’ activity cross-platform.

But let’s discuss how you can go beyond GA4 basics. Our GTM event tracking guide will help you navigate through a sea of opportunities, which is custom events creation. Let’s get to it.

How Does GA4 Event Tracking Generally Work?

Broadly speaking, GA4 collects behavioral signals generated from user interactions with your website or mobile app. Each action from pageview to purchase is considered an event. The platform reads, aggregates, and organizes the data on these actions to represent it through meaningful reports and insights.

Unlike the previous Universal Analytics version, GA4 offers a much more informative view of active users. In the Universal Analytics version, a site visit triggered a session that ended 30 minutes past the last user activity or once another designated action took place.

In contrast, Google Analytics 4 automatically connects all user interactions to form a continuous session. This way, you can track the entire user journey. And if you predefine Google Analytics custom events, you’ll manage to attribute valuable actions to particular groups of users segmented by analytics dimensions and metrics.

Types of Events Tracked by Google Analytics 4

Events in GA4 are split into four types:

What Events Does GA4 Detect Automatically?

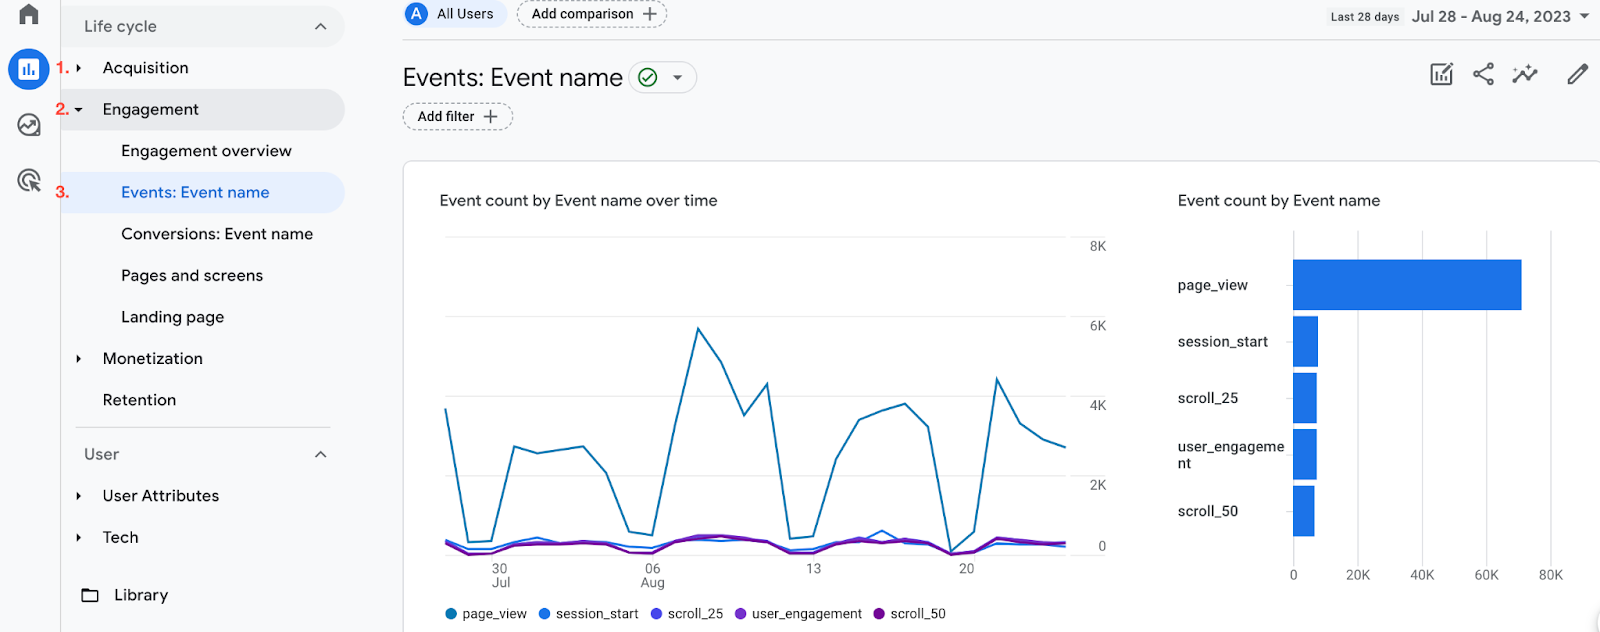
Automatically collected events build up a wireframe for your web analytics, informing you on basic actions. Here are the default events that feature in web and app reports:

Web-Related Events

App-Related Events

click

dynamic_link_app_update

file_download

dynamic_link_first_open

first_visit 

dynamic_link_app_open

form_start

error

form_submit

firebase_campaign

page_view

firebase_in_app_message_action

scroll

firebase_in_app_message_dismiss

session_start

firebase_in_app_message_impression

session_start

firebase_in_app_message_impression

user_engagement

first_open

video_complete

in_app_purchase

video_progress

notification_dismiss

video_start

notification_foreground

view_search_results

notification_open


notification_receive


os_update


screen_view

Note that certain default events like first_visit, user_engagement, and session_start are common for both web and app event tracking. Also, there’s a set of default qualitative parameters attached to automatically collected event to add detail on it:

  • language
  • page_location
  • page_referrer
  • page_title
  • screen_resolution
  • language
  • page_location
  • page_referrer
  • page_title
  • screen_resolution

The great thing about GA4 default event tracking is that it retrieves and aggregates user signals without any code interventions. All you need to do is paste the Google tag ID in the corresponding field within your CMS setting, and you’re ready to go. 

Google provides detailed instructions on how to add Google Tag ID using native CMS integrations.

Enhanced Measurement Events vs. Recommended Events vs. Custom Events

Let’s figure out how these types of event tracking differ from each other.

Enhanced Measurement Events is a group of automatically tracked events that you can arbitrarily add to event reporting. The main advantage is that these measurements provide insightful interaction data on file downloads and form submissions, e.g., last-click data, out-of-the-box. It means you don’t need to involve developers to fetch such data points as Google Analytics custom events.

Ehanced Measurement options in GA4

As you can see from its description, the Enhanced Measurement feature adds up events related to interactions with UI on-page elements to enhance the picture of the user journey. If you decide to include/exclude some of the default events from measuring, you can do it by clicking the gear button and switching off the corresponding toggle buttons.

Configuring Enhanced Measurements in GA4

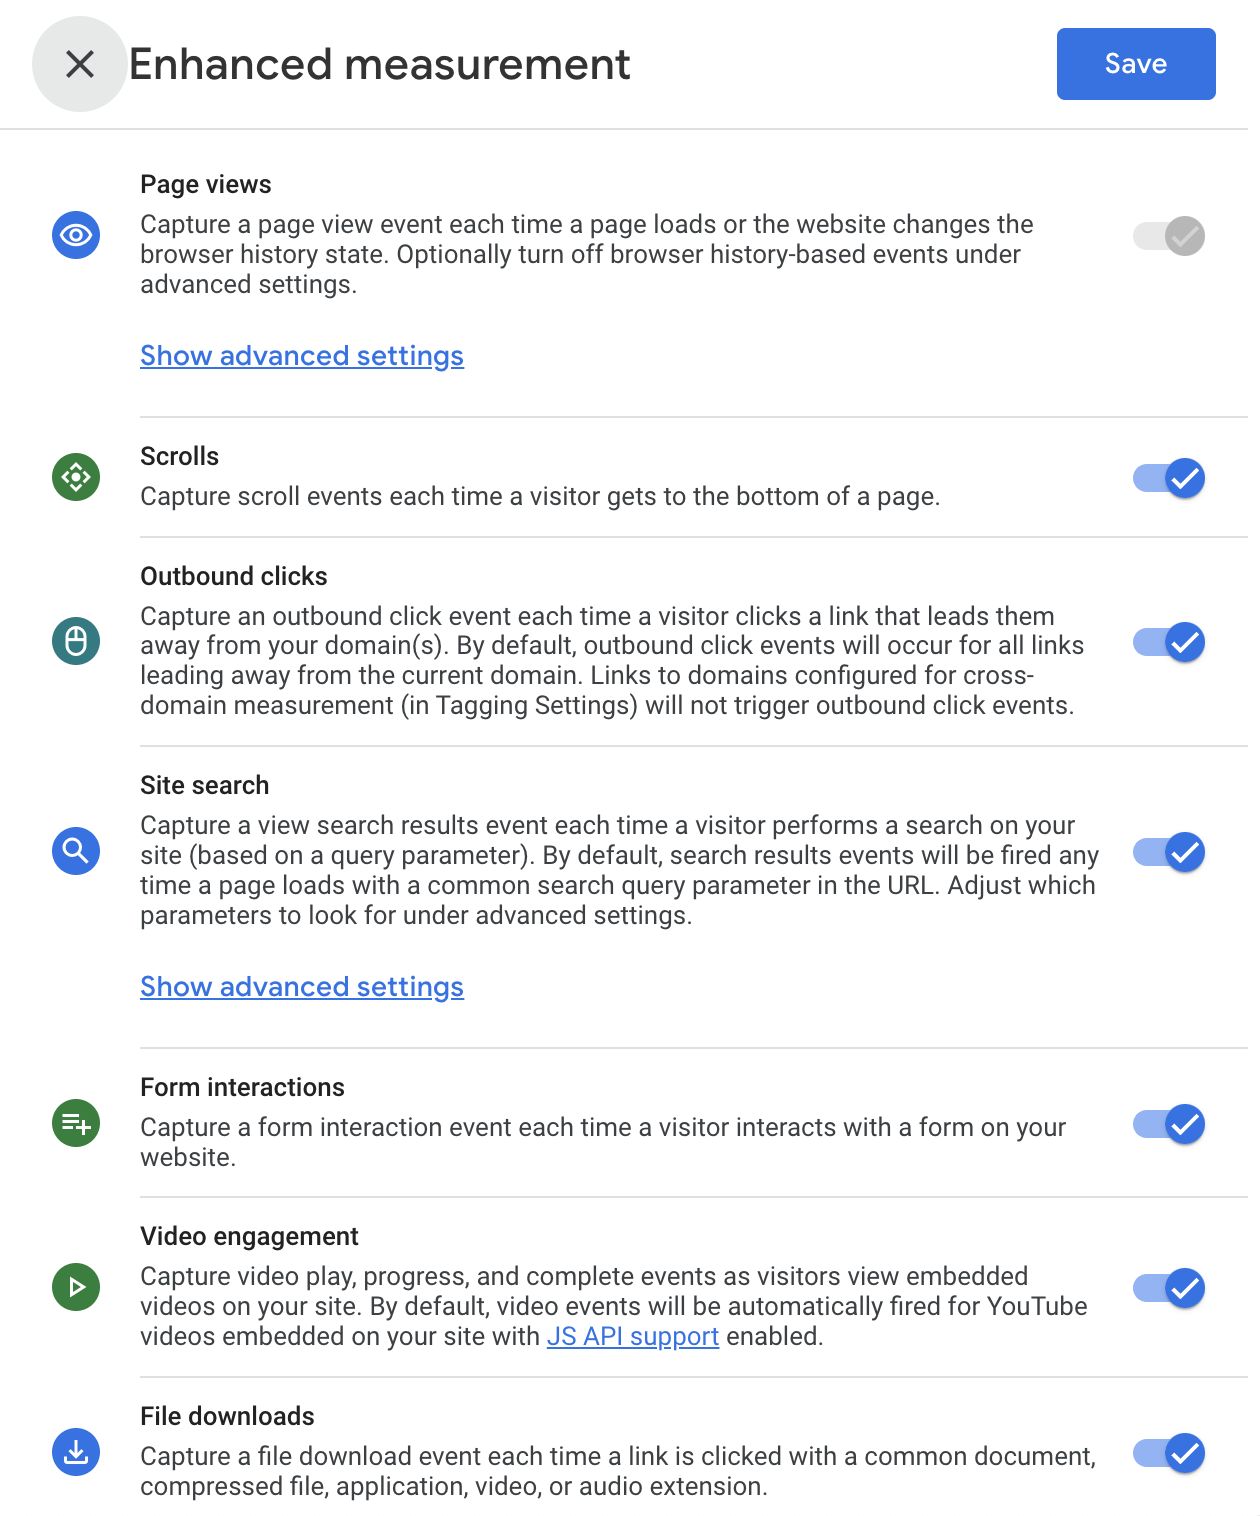
Bear in mind that if your website form is not located within the typical <form> HTML tag, it won't be recognized by Google Analytics 4 as such. Therefore, neither form_start, nor form_submit events will be recorded.

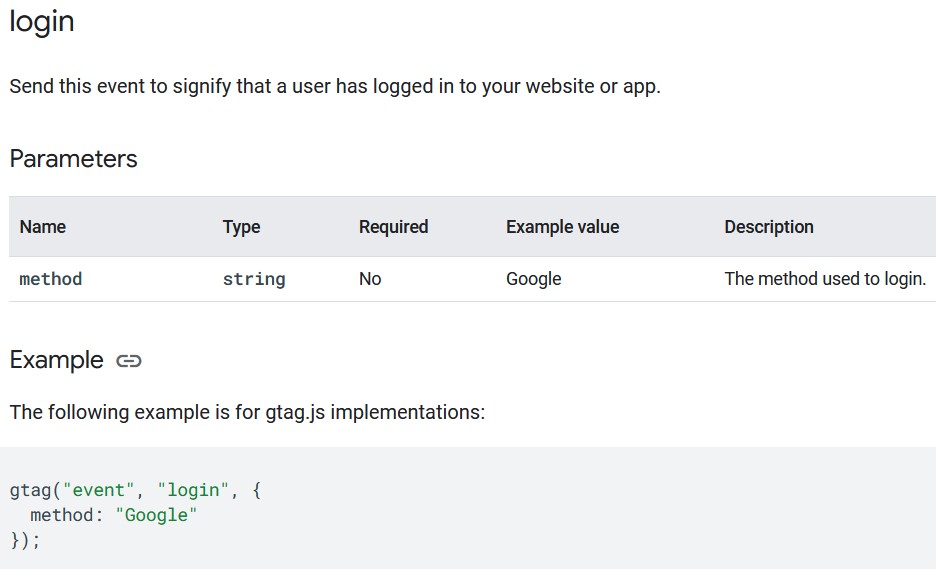
With Recommended events, marketing analysts might go a bit deeper into user interactions that matter for eCommerce. Such is, for instance, an event called add_shipping_info, which signifies submission of shipping details, and a log_in event that can specify the exact user login method by giving out the corresponding parameter to GA4 through gtag.

gtag script to track user login as Recommened Event

In turn, Сustom Events should come in handy when you need to enrich an analytics report with an event not enlisted in Automatically Tracked ones, Enhanced Measurement, or Recommended Events.

Before configuring Google Analytics custom events in GA4, you must consider the following:

  • You must come up with your own names for Custom events that differ from reserved ones. So verify with the Google documentation when naming.
  • You can designate event parameters that are already used for Enhanced Measurement. For instance, link_url and link_text when adding event tracking for link clicks.
  • You should edit the event tag configuration in Google Tag Manager to add custom parameters. We will provide you with more details as we further get to the illustrative step-by-step tutorial in this article.
  • GA4 allows you to send up to 25 parameters with a single event.
  • Finally, you won’t be able to see parameter values in GA4 reports, except for real-time reports and DebugView. Unless you’ve added them as custom dimensions in the Admin section of GA4.

Fair enough, it will take some practice to start using Google Analytics custom events confidently. However, it will immensely broaden your tracking capabilities and will supply you with actionable insights on CRO improvement. 

Why Tracking Custom Events with GTM Tags?

Modern-day digital marketing simply can’t do without measurable and precise data to understand the ways user flows actually go. Custom Events allow you to choose user actions that are case-specific and meaningful in terms of your current marketing efforts. You can put these crucial milestones of the user journey on the map and, most importantly, track what actual chain of preceding events has led to them.

Such trackability lets you keep your fingers on first and last-click attributions, define what events matter for user engagement, and more. We recommend enabling custom events if you want to:

Track Third-Party Events, such as Calendly Bookings 

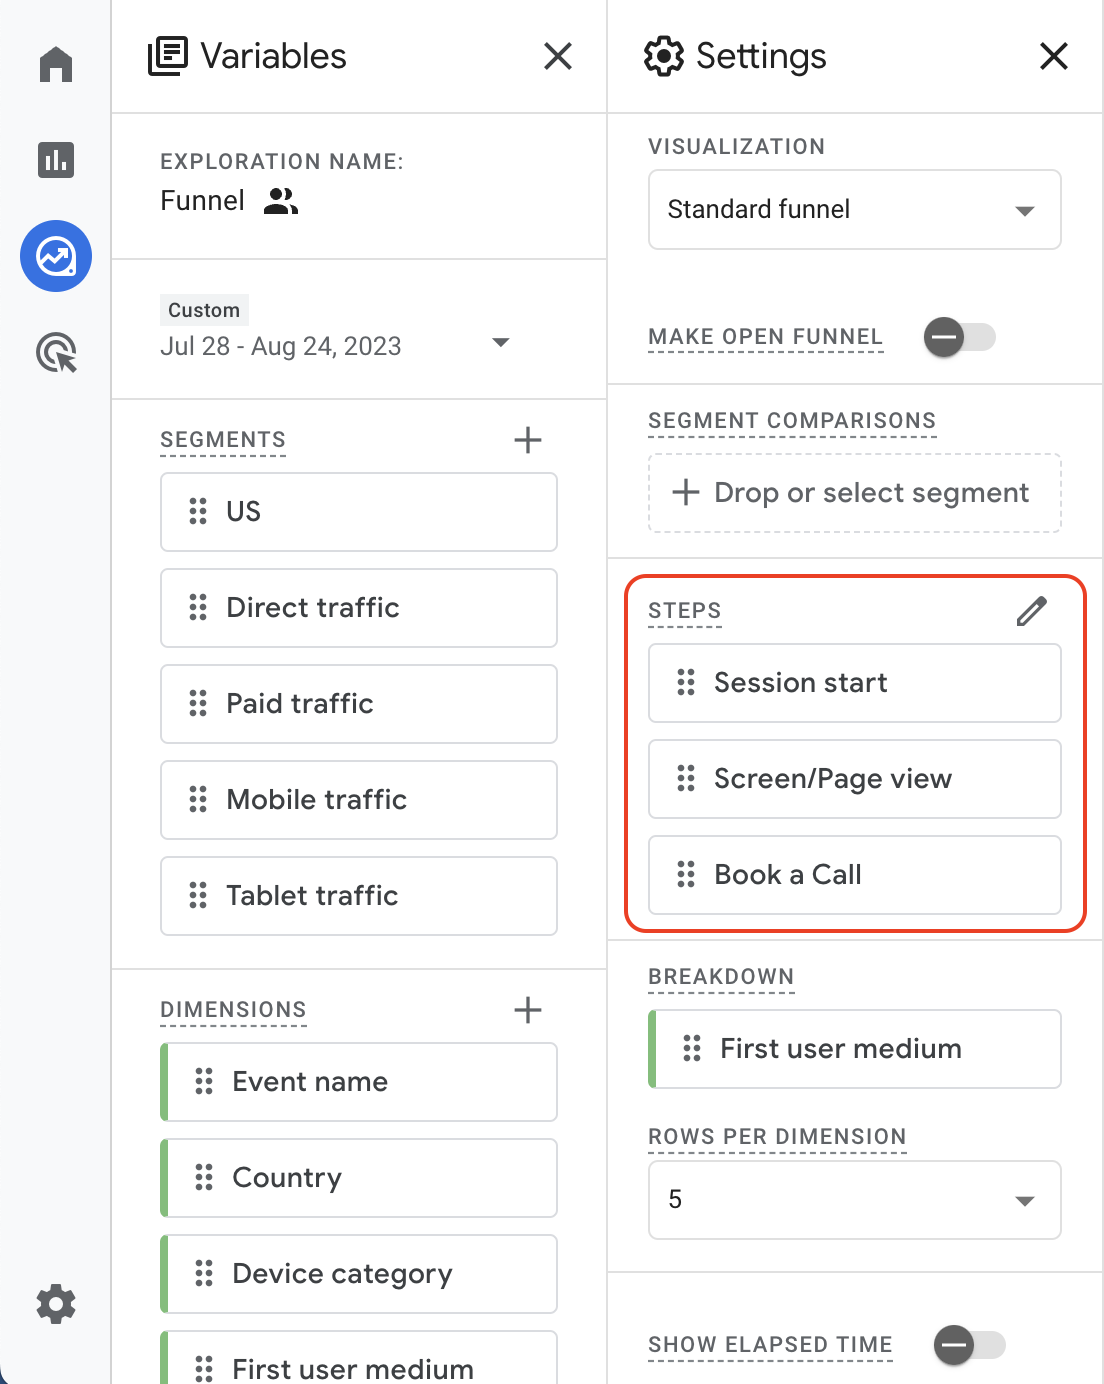
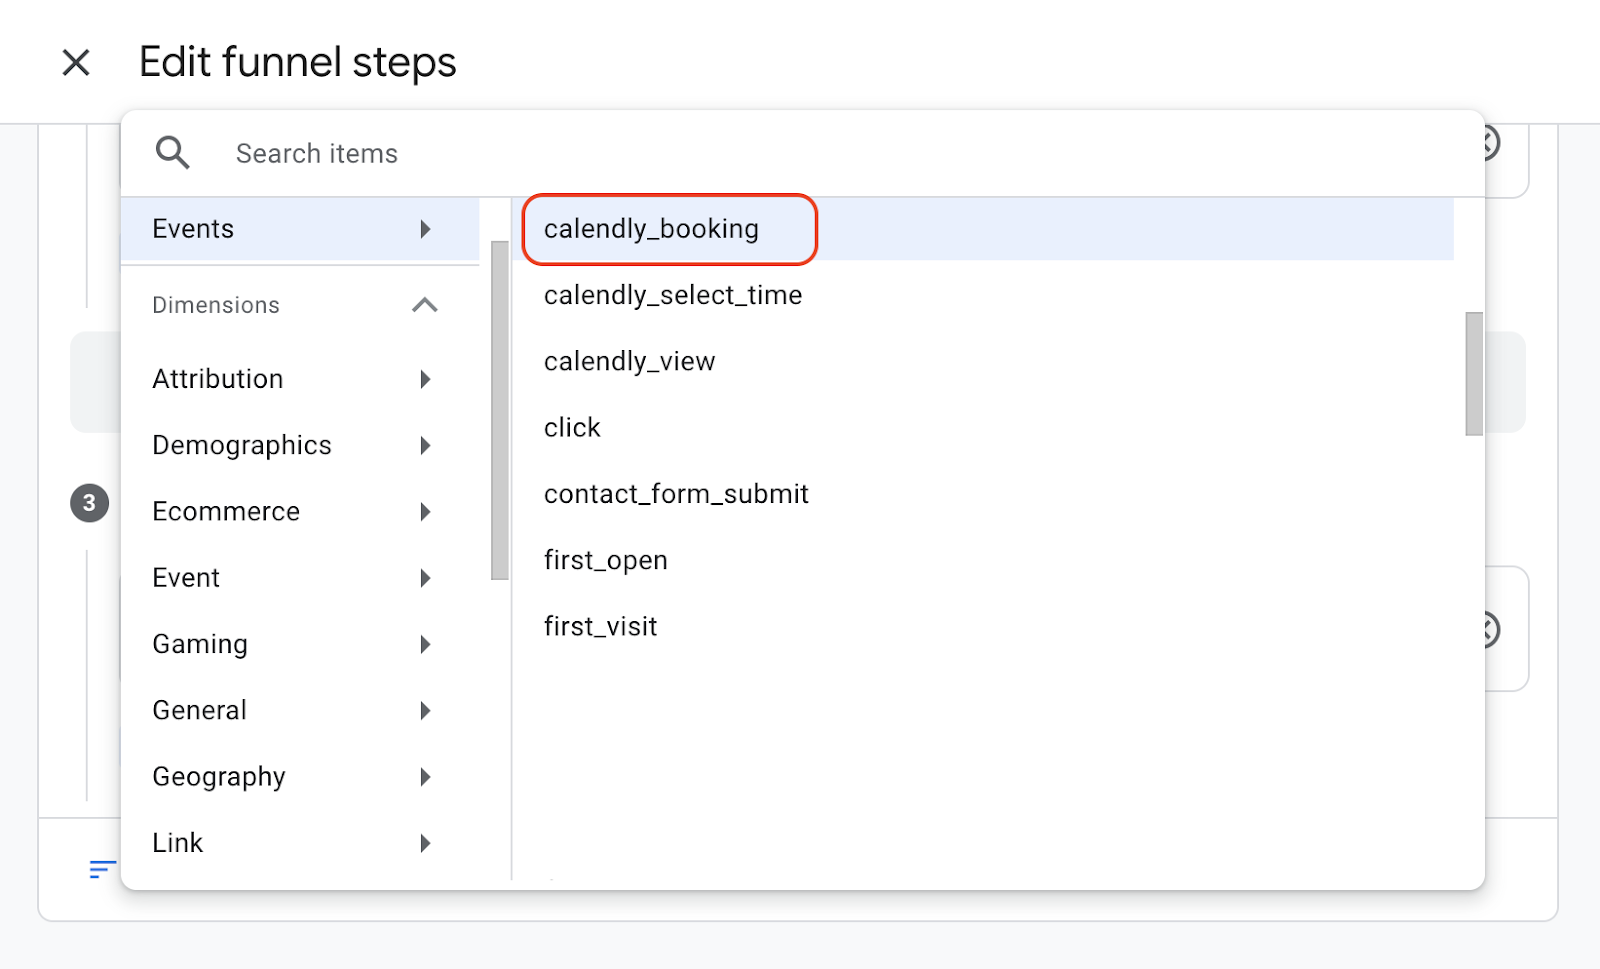
If you witness an unexpectedly low conversion rate in a recent lead gen campaign, it’s high time for you to investigate funnel leaks. For instance, you can set custom events for calendly_booking to determine whether poor CTA or page UX caused a significant drop-off rate.

Configure your custom event, then go to Exploration in GA4. Choose Funnel Exploration and customize Steps in Tab Settings:

Setting Funnel Exploration view for calendly_booking custom event in GA4

‍

Picking calendly_booking event as a funnel step for Funnel Exploration view

Identify Engagement Contributors Among Pages

With Google Analytics 4 Event Reports, it’s fairly simple to tell if navigation to a particular page leads to increased user engagement. Let’s see how it works.

GA4 utilizes the engagement_time_msec parameter to calculate the timespan between consequent events. The countdown starts when the user lands on a page (page_view, first_visit) or navigates to it on-site (page_view, session_start).

Once a user focuses out from your website to another browser tab or navigates to another page of your site, GA4 gets a user_engagement event that specifies the time when the user was active.

Besides user_engagement, there’s a default event scroll that also supplies GA4 with the engagement_time_msec parameter value. The overall engagement time will be added up once the user leaves your site and ceases the current session.

In Event Reports, you can set custom event tracking and clearly see how user_engagement goes up when the custom event fires.

The view of Event Reports in GA4

Additionally, you can access DebugView to visualize the engagement metric:

DebugView visualization of events lineage in GA4

Track Event-Specific Goals for Ad Campaigns

With custom event tracking, you can gauge and assess the overall impact of paid ad campaigns to determine whether your lead pipelines perform well. In particular, using the event-specific conversion of your LinkedIn ad campaign.

o track custom events, which are clicks and conversions that matter in terms of a LinkedIn ad campaign, you’ll need to configure the LinkedIn Insight Tag and connect it to your current GTM workspace. We’ve provided an illustrative end-to-end guide on how to do it, so feel free to check it out.

This is where Marketechy steps in to develop a plan of work tailored to your growth marketing, metrics, and budget.
Talk to Us
White word balloon icon

Setting GTM Event Tracking in GA4 End to End

Now let’s go through the entire process of custom events creation from A to Z. It’s a bit of a mind-twister, so we will illustrate each step mile of it with screenshots to make it easy to comprehend.

#1. Connect Your Website to Google Tag Manager

If you’re set to launch custom event tracking with GA4, you should first add a Google Tag Manager tracking script to the website code. If you run your website on Webflow, check our definitive Webflow SEO guide to see how to do it.

#2 Enable Google Tag Manager’s Preview Mode

You must activate GTM Preview mode to configure custom events firing based on Variables and Values you'll receive in DebugView. Click the Preview button in the top right of Google Tag Manager’s main screen.

How to navigate Tag Assistant manager in GTM workspace

You’ll be directed to the Tag Assistant’s tab and see the pop-up window asking you to enter the URL you want to test. In our example, we paste the address of a homepage. But if you set a custom event accessible only on a particular page, you must paste its URL instead.

Setting URL address for event tracking through GTM

After you press “Start,” the new browser tab will appear. It must contain the following badge pointing out that the debug signal is active for the selected URL:

Google Tag Assitant connected

Return to the Tag Assistant tab and check whether it displays the following success message:

Submitting initial Tag Assitant connection

Once it’s done, you can move on to configuring custom event tracking.

#3. Configure Custom Event Trigger with Google Tag Manager

Suppose you’ve decided to set event tracking configuration for main navigation menu clicks. In such a case, your goal is to set trigger conditions that distinguish top menu clicks from any others. Follow these steps to implement the necessary trigger conditions:

1. Enter GTM Preview mode and click on one of your site’s navigation links. You’ll see the Link Click event appear in the Event Timeline (Preview’s mode right sidebar):

The view of GTM Preview mode

2. Remember that Link Click will appear in the Event Timeline only if you’ve previously enabled the Just Links GTM trigger for this page.

If not, go to Tag Manager > Triggers > New. Set Trigger Type to Clicks - Just Links and set firing condition to All Link Clicks:

‍

How to configure Cutom Event trigger in GTM

3. Then get to the Variables section in Google Tag Manager and click on Configure Built-In Variables. Tick all checkboxes and apply changes:

Setting Variables for cutom event trigger

4. Get back to your Preview mode tab and refresh it by clicking the Preview button again. Also, return to the website and click once again on one of your top menu navigation links so that Link Click will appear in the event timeline. Choose it from the list and check the Variables section.

How to check event Variables in GTM Preview mode

Your goal is to determine a unique Click Class or Click Element or Click ID or Click Target or Click Text value that will distinguish top menu links. And here it is – nav-link dark.

Identify unique class value of cutom event in DebugView

5. Now, you should update the Trigger Configuration for the GTM container. Open All Link Clicks and set the obligatory condition for the event trigger “Click Classes containnav-link dark.”

How to set trigger firing condition for GA4 custom event

#4. Create GA4 Event Tag

What is custom event in Google Analytics?

In Google Analytics, a custom event is a user interaction with a website that is tracked and recorded based on specific actions or events defined by the website owner. These events can include clicks on buttons, downloads, video views, or any other user interactions that hold significance for analyzing user behavior and engagement on the site. Custom events provide more tailored insights beyond the standard metrics tracked by Google Analytics.

Ok, now your event trigger will set off each time someone clicks the menu navigation link. Your next step is to set event tracking running. You’ll need to set a specific event tag in GA4 > Tags > New> Google Analytics: GA4 event:

Creating a new GA4 event tag

In our example, we wanted to specify that this is Header Navigation clicks, so we put it as header_nav_link_click. On top of that, we wanted to track what exact menu items get clicked more often. So we’ve set two additional parameters, header_nav_item_name and  header_nav_url, that will show you exactly those values that you have specified. Later, you can set these as custom dimensions to see the navigation link URLs and names in Exploration and Funnel reports.

Once you’ve done that, get to Tag Assistant, refresh Preview Move, and click some menu items. Open Link Click list item and check whether there’s a file telling that the GA4 Event tag has been fired:

Verify custom event trigger firing in GTM Preview mode

Now, everything is in place. But before hitting “Publish,” we advise running tests on custom event tracking with GA4 DebugView.

#5. Test Custom Events in GA4 DebugView

To access DebugView, you must go to GA4 account and enter the Admin section:

How does event timeline looks in DebugView

There are a couple of ways to activate DebugView custom event tracking for the selected page:

  • Installing GA debugger extension for Google Chrome
  • Having GTM Preview Mode enabled for the page you’re testing
  • Sending a debug_mode parameter together with an event

Any of these will work for you. There’s no difficulty handling the first and the second option, so let’s focus on adding debug_mode parameters to GA4 Tag Configuration. You must edit the GA4 Configuration tag by adding the corresponding Field Name and Value, as shown in the screenshot below:

How to edit GA4 Configuration Tag to send debug_mode parameter with custom event

Eventually, you will get the following visualization of the GA4 events sequence for your page in DebugView.

DebugView event timeline visualization

Select one of your Google Analytics custom events in this chain and check if it carries previously set parameters. As we can see, our header_nav_link_click event works just like it should.

Event-specific parameter sent properly

Note, however, that DebugView sometimes lags behind actual user actions on a site. But mostly the delay is no longer than a couple of minutes. Now that you know that GA4 gets parameter values correctly, you can submit changes in GTM Preview Mode.

#6. Add Custom Event as a New Dimension to GA4 Reports

Finally, we’ve made it to reporting that will provide you with event-scope metrics. Before going to actual reporting on Google Analytics custom events, let’s make a little stop to clarify what custom definitions have to do with it.

As mentioned, the event quantifiable statistics can only be viewed in real-time reports. One of them is Engagement, and the other is Events itself:

Real-time Event Report in Engagement section of GA4

That said, it’s possible to integrate events into report tables if you register them as Custom Definitions. You should start by navigating to the Admin section of the GA4 Account. Look for Custom Definitions in a Property menu:

How to set custom events as custom definitions for GA4 reports

Choose “Create Custom Dimensions” in the drop-down list. Name your custom dimension the same as the custom event parameter. Then, set the Scope value to “Event” and duplicate the exact name of the Event parameter from the GTM tag in the same-titled field. 

Create custom dimension with corresponding event parameter

Hit “Save” and configure the Dimension for the header_nav_item_name parameter in the same way. Now, you’ll have to wait 24 hours before these custom parameters will be collected for Google Analytics 4 reports.

#7. Customize Free Exploration Reports

In the GA4 Explore menu, you can create various report types, including Free Form, Funnel Exploration, Path Exploration, Cohort Exploration, etc. But to be concise, we will give you an example of how to build a whole new report that utilizes custom event tracking.

1. Head to Explore > Blank to start assembling report template from scratch.

2. Hit “+” next to Dimensions to add two custom dimensions, header_nav_item_name and header_nav_item_url.

Adding cutom dimension to Free Exploration report in GA4

3. Now that custom event parameters are added as report table Dimensions, you can sign them as filters. Do it as shown below:

Setting custom dimensions as table filters

4. Now, let's configure what we should see in the table's rows. Let's add our 'header_nav_item_url' dimension to the rows configuration so that we can see the links that were clicked. To add rows, you should drag dimensions from the variables panel.

Add URLs of custom click events as rows of Free Exploration report

5. Sweet, now assign the Device category for columns to separate click statistics for different device users. And, of course, don’t forget to drag and drop Event count to Values to get the numbers of clicks for different categories of users.

Set Device Category as columns in Free Exploration report

6. The outcome of your manipulations should look like this:

Custom event report table made with GA4 Free Exploration builder

But let’s try to go inventive on our custom event tracking and see what specific campaigns brought visitors that triggered custom events the most.

7. You’ll need to browse for the Dimension called Session Campaign and import it:

Adding Session Campaign as additional dimension

8. Then drag this dimension to the Rows list in Tab Settings:

Session Campaign added as table row for custom event report

The table view will update respectively. Currently, we do not have any data from advertising campaign sources since we have restricted the timeframe, and there have been no ad clicks during this period. 

The finalized view of custom event report table

Nevertheless, you have the liberty to tailor and enhance the data within the Exploration table's view by employing any of the Dimensions as filters. This marks the finishing step in crafting customized event tracking reports through the GA4 Free Form report building tool.

Wrapping Up

That was all for configuring Google Analytics custom events using Google Tag Manager. We’re thrilled to share this guide as we know from our clients and business partners that many struggle to scrape through GA4 event tracking and reporting. Hope this guide will help you gauge and assess the efficiency of your website touchpoints and UI elements.

Contact us anytime you’ll need a seasoned helper to take on Google Analytics management. Best regards from Marketechy!

Ready to grow your online presence and quality leads? Drop us a line!